Branches and Workstations
Manage financial institution (FI) branches and workstations. On the Admin Dashboard page, click Branches & Workstations, or click Administration > Branches & Workstations from the menu.
Manage financial institution (FI) branches. On the Admin Dashboard page, click Branches & Workstations, or click Administration > Branches & Workstations from the menu. When the Branches tab is selected, all of the financial institution's branches are displayed.


|
Search Branch | Click in the Search Branch field and begin typing to display specific branches. | ||||||||||||

|
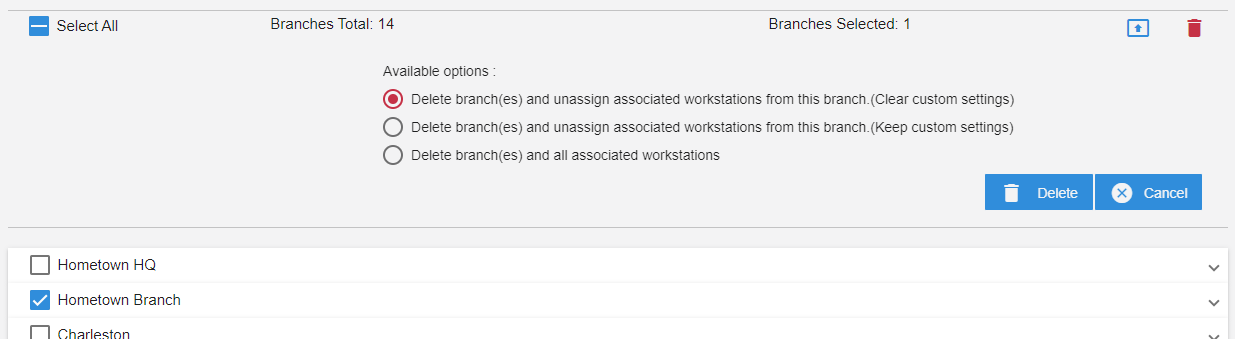
Select All | When the Select All checkbox is selected, all of the branches within the financial institution are selected. When selected again, all of the branches within the financial institution are deselected. The Select All checkbox is blue ( ) when one or more branches are selected. ) when one or more branches are selected. |
||||||||||||

|
Branch | All of the branches are listed on this page. Hover over a branch to display the following icons. Click the branch to expand and collapse the row. When the branch is expanded, the branch is in edit mode to allow you to edit the branch name. Refer to the Edit icon for details. | ||||||||||||
|
|
|
|
||||||||||||

|
Branches / Workstations Tab | Toggle between the Branches and Workstations view. | ||||||||||||

|
New Branch | Click New Branch to create a new branch. The New Branch window is displayed. Enter a name for the branch. A branch name is required. The field requires a minimum of 4 characters and can have a maximum of 25 characters. Supported special characters are dashes (-), hyphens or hashtags (#), colons (:), and spaces. Spaces cannot be the first or last characters. Click Close to close the window without adding a new branch. Click Cancel to clear any values in the Branch Name field. Click Save to add the new branch. | ||||||||||||

|
Clone Source | Copy the settings from one branch and apply those settings to one or more other branches.
To copy the settings from one branch and apply those settings to one or more other branches, perform this procedure:
Note: Alternatively, you can select the branches that will have their existing settings replaced first, and then click Clone Source to select the source branch. |
||||||||||||

|
Delete | Click Delete to delete one or more branches.
|
||||||||||||

|
Expand / Collapse | When the arrow is pointing down, the row is collapsed. When the arrow is pointing up, the row is expanded. Click anywhere on the row to expand and collapse the row. |


 icon.
icon. 


Manage financial institution (FI) workstations. On the Admin Dashboard page, click Branches & Workstations, or click Administration > Branches & Workstations from the menu. When the Workstations tab is selected, all of the financial institution's workstations are displayed.

|
|
Search Workstation | Click in the Search Workstation field and begin typing to display specific workstations. | |||||||||
|
|
Select All | When the Select All checkbox is selected, all of the workstations within the financial institution are selected. When selected again, all of the workstations within the financial institution are deselected. The Select All checkbox is blue () when one or more workstations are selected. |
|||||||||
|
|
Workstation | All of the workstations are listed on this page. Hover over a workstation to display the following icons. Click the workstation to expand and collapse the row. When the workstation is expanded, the workstation is in edit mode to allow you to edit the workstation name and port. Refer to the Edit icon for details. | |||||||||
|
|
|
|
|||||||||
|
|
Branches / Workstations Tab | Toggle between the Branches and Workstations view. | |||||||||
|
|
New Workstation | Click New Workstation to create a new workstation. The New Workstation window is displayed. Enter a name for the workstation. A workstation name is required. The field requires a minimum of 4 characters and can have a maximum of 25 characters. Supported special characters are dashes (-), hyphens or hashtags (#), colons (:), and spaces. Spaces cannot be the first or last characters. Click Close to close the window without adding a new workstation. Click Cancel to clear any values in the Workstation Name field. Click Save to add the new workstation. | |||||||||
|
|
Move |
Add an existing workstation to a branch. To add one or more existing workstations to a branch, perform this procedure:
Note: Alternatively, you can select the workstations that will be added to a branch first, and then click Move to select the branch. |
|||||||||
|
|
Clone Source | Copy the settings from one workstation and apply those settings to one or more other workstations.
To copy the settings from one workstation and apply those settings to one or more other workstations, perform this procedure:
Note: Alternatively, you can select the workstations that will have their existing settings replaced first, and then click Clone Source to select the source workstation. |
|||||||||
|
|
Delete | Click Delete to delete one or more workstations.
Note: Alternatively, you can select the workstations that will be deleted first, and then click the Delete icon. |
|||||||||

|
Expand / Collapse | When the arrow is pointing down, the row is collapsed. When the arrow is pointing up, the row is expanded. Click anywhere on the row to expand and collapse the row. |


