Imaging Indexes
Imaging indexes interface between eReceipts and your imaging system. They are used to generate file names and data files for your imaging system. On the Admin Dashboard page, click Imaging Indexes, or click Administration > Imaging Indexes from the menu to open the Imaging Indexes page. When changes are made to the fields, click Save to save the changes. Click Restart Archive Agent to restart the Archive Agent service after making changes to fields. If you have not saved changes yet, click Reset to cancel any changes made. Refer to Agents for more information about the Archive Agent.
Refer to the following content for details about the Imaging Indexes page and the available imaging systems. The images here are examples only.
Note: Depending on your environment, you may see the term "account" used instead of "member" in the Admin Portal. The examples in this documentation use the term "member" except where noted. When entering index information in environments that use the term "account," be sure to update the data accordingly. For example, {MemberName} should be changed to {AccountName}.
Stop: Do not change settings during business hours.


|
Imaging Systems | Select an imaging system from the dropdown menu. The page will be refreshed based on your selection. |

|
Available Indexes | The indexes in the Available Indexes area are different for each transaction (e.g., Member Number / Account Number, Teller, Date, etc.). They are used to format the archived PDF file name and data. The left column fields are index labels and are used to customize the label name (Imaging Index Name) that should appear in the index file. An institution can configure these as desired. If these labels are left blank, then they should not appear in the index name elements section of the index XML file. The right column displays the index field monikers. Custom functions can be applied to the index field monikers. The index field monikers are evaluated and are transformed to a value when the archived PDF and XML are created. Custom SBA, Custom Transaction Type, and Custom Authentication fields are optional. These fields were added to configure archived file names to be able to further identify the PDFs. Refer to the following example.
These indexes are used to create the output PDF and index line entries in the index.txt file. Line templates are used to create the records in the index.txt. Index line entries can be customized. Reverse the order of the index line entries if needed and add or remove other indexes. Custom functions can be applied to the archived PDF file name elements and used to modify the index fields in the line template. Refer to the following example.
|

|
Available Functions | The Available Functions area lists system-defined, custom functions that can be used to modify an index field value. Click on a function in the Available Functions area to view details about using that function. Refer to Available Functions for details. |

|
Financial Institution Indexes | Financial Institution (FI) Indexes are specific to an imaging system. These are index fields for service-based systems and systems that do not output to index file. These indexes will appear in the non-index data section and will output to the configured tags in index.xml. Refer to each imaging system for details about this area. |

|
Restart Archive Agent | Click Restart Archive Agent to restart the Archive Agent service after saving changes to fields. If the Archive Agent is not restarted, changes will not go into effect. Refer to Agents for more information about the Archive Agent. |
|
|
Reset |
If you have not saved changes yet, click Reset to cancel any changes made. |
|
|
Save |
When changes are made to the fields, click Save to save the changes. |


Index style Access RMS does not generate an index file because the API is used to directly import the PDFs into the imaging system. Fields that can be edited are active. The Financial Institution (FI) Indexes are described below.
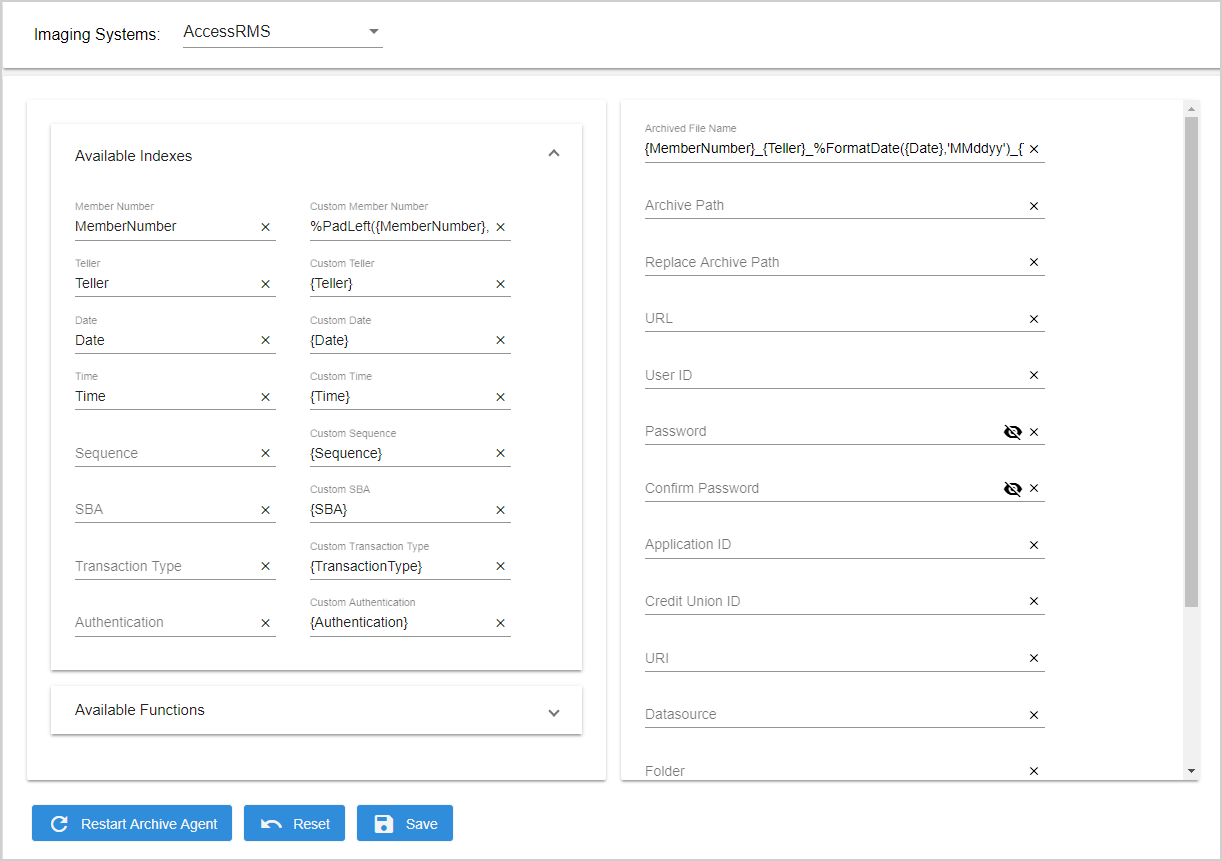
| Archived File Name | The PDF file name of the archived receipt. Index fields are listed in the order that they should appear in the file name of the PDF. Separators may be used to separate the index fields. Custom functions can be used on indexes to modify them. Use the GetCurrentDateTime function to prevent duplicate transactions. Refer to Available Functions for details. |
| Archive Path | N/A |
| Replace Archive Path | N/A |
| URL | Refer to your IT group for your required settings. |
| User ID | To authenticate user for the remote session on the server. |
| Password | To authenticate user for the remote session on the server. |
| Confirm Password | To authenticate user for the remote session on the server. |
| Application ID | Application where the document will be imported. |
| Credit Union ID | Refer to your IT group for your required settings. |
| URI | Refer to your IT group for your required settings. |
| Datasource | Refer to your IT group for your required settings. |
| Folder | Refer to your IT group for your required settings. |
| Name | Refer to your IT group for your required settings. |
| Vendor ID | Refer to your IT group for your required settings. |
| Document Type | Enter {Document_Name}. Capitalization is required. |
AMS installations require .NET Framework 4.6. The settings on this page are dependent on the AMS Imaging System and become global settings for the FI. AMS is service based, which means index files are not created but the PDFs are directly imported to the imaging system.
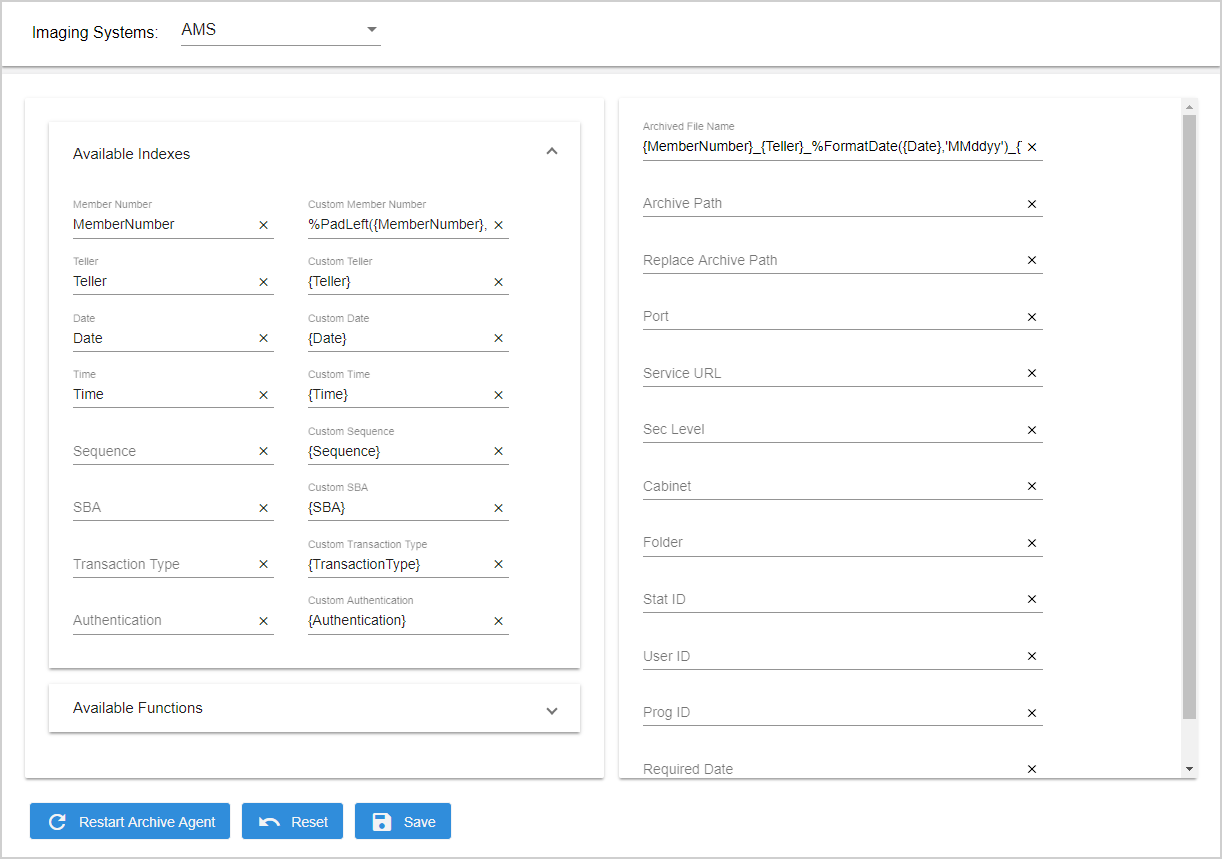
| Archived File Name | The PDF file name of the archived receipt. Index fields are listed in the order that they should appear in the file name of the PDF. Separators may be used to separate the index fields. Custom functions can be used on indexes to modify them. Use the GetCurrentDateTime function to prevent duplicate transactions. Refer to Available Functions for details. |
| Archive Path | N/A |
| Replace Archive Path | N/A |
| Port | Refer to your IT group for your required settings. Custom functions cannot be used with Service URL or Port. |
| Service URL | Refer to your IT group for your required settings. Custom functions cannot be used with Service URL or Port. |
| Sec Level | Enter the Sec Levl as defined in the AMS system |
| Cabinet | Enter the Cabinet name as required by your IT group. This field is case sensitive. |
| Folder | Enter the Folder name as required by your IT group. |
| Stat ID | Enter these settings as required by your IT group. These settings may optionally be mapped to the index using the external index setting. |
| User ID | Enter the User ID as required by your IT group. |
| Prog ID | Enter these settings as required by your IT group. These settings may optionally be mapped to the index using the external index setting. |
| Required Date | Enter “IMM_STDIND_DATE”. Capitalization is required. |
The settings on this page are dependent on the Bankware Imaging System and become global settings for the FI. Bankware Imaging System requires the indexes to be passed in the below format in the output index.csv file.

| Archived File Name | The PDF file name of the archived receipt. Index fields are listed in the order that they should appear in the file name of the PDF. Separators may be used to separate the index fields. Custom functions can be used on indexes to modify them. Use the GetCurrentDateTime function to prevent duplicate transactions. Refer to Available Functions for details. |
| Archive Path | The location where your imaging system will pick up the archived PDF. The folder will be created in the specified path by the Archive Agent during Archive Agent installation. UNC paths may be used. Folder should be have Read/Write permissions. If the Archive Path field is empty, then the PDFs will be created in this folder by default: %InstallPath%\eReceiptArchiveAgent\ArchivePDF. |
| File Name | The file type must be index.csv. |
| Line Template |
The line format within the index file (one line per document). This is used to create the records in the index file. The Line Template field can be used to customize the order of indexes. Index field names must include the braces “{}”. For example, “{MemberNumber}” is correct. “MemberNumber” will not function correctly. This is the default Line Template: {MemberNumber},{Teller},{Date},{Time},{ArchivePath} This template will produce a listing of all user index fields. The example values are: {MemberNumber}: 00000011 {Teller}: 320 {Date}: 1/25/2021 {Time}: 10:30:40 (hh:mm:ss) {ArchivePath}: E:\PDF The resulting line format in the index file is 00000011,320,012521,103040,E:\PDF\00000011_ 320_012521_103040.pdf. |
The DirectorySweep selection will generate a PDF file that is named using the indexes. No other index files will be generated.
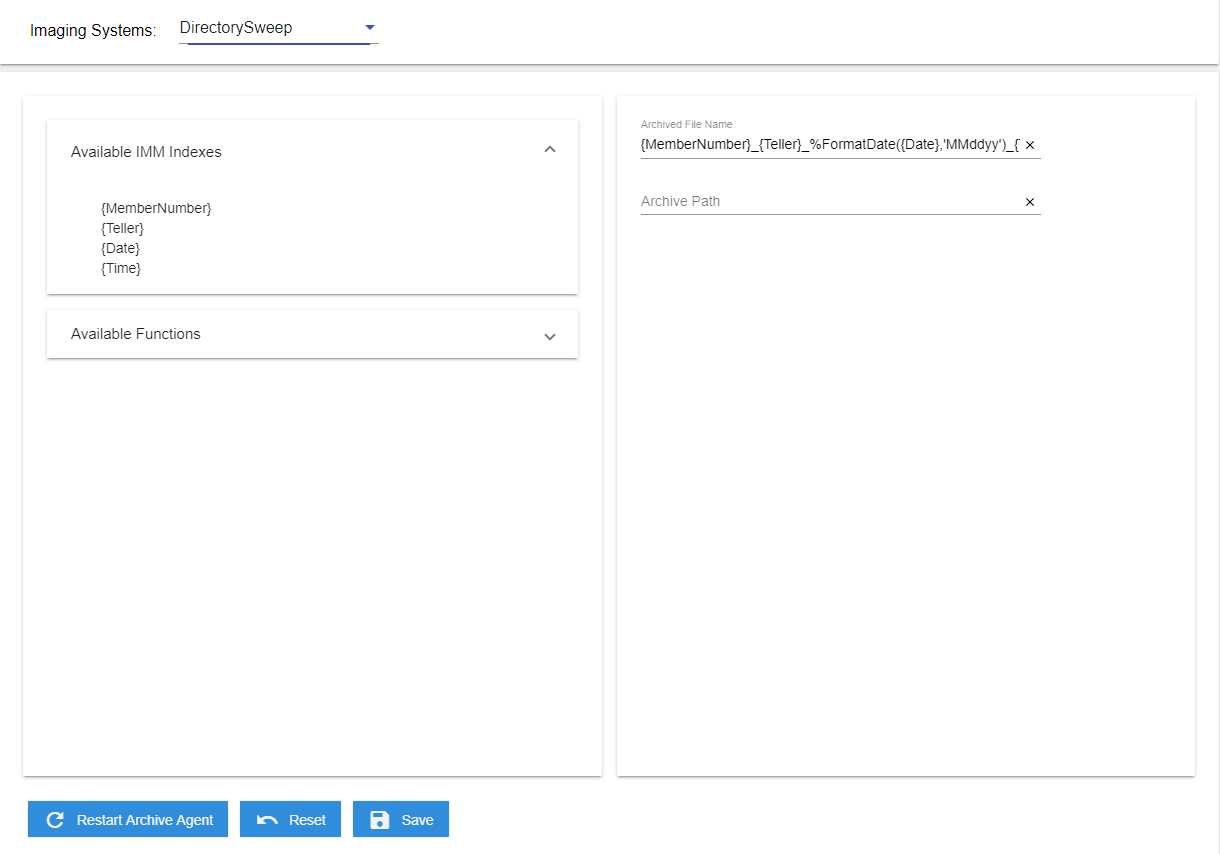
| Archived File Name | The PDF file name of the archived receipt. Index fields are listed in the order that they should appear in the file name of the PDF. Separators may be used to separate the index fields. Custom functions can be used on indexes to modify them. Use the GetCurrentDateTime function to prevent duplicate transactions. Refer to Available Functions for details. |
| Archive Path | The location where your imaging system will pick up the archived PDF. The folder will be created in the specified path by the Archive Agent during Archive Agent installation. UNC paths may be used. Folder should be have Read/Write permissions. If the Archive Path field is empty, then the PDFs will be created in this folder by default: %InstallPath%\eReceiptArchiveAgent\ArchivePDF. |
Imaging indexing information is sent to an API for use in the eFichency Imaging System. eFichency is service based, which means index files are not created but the PDFs are directly imported to the imaging system. The settings on this screen are dependent on the eFichency Imaging System and become global settings for the FI. Custom functions can only be used with Repository ID.
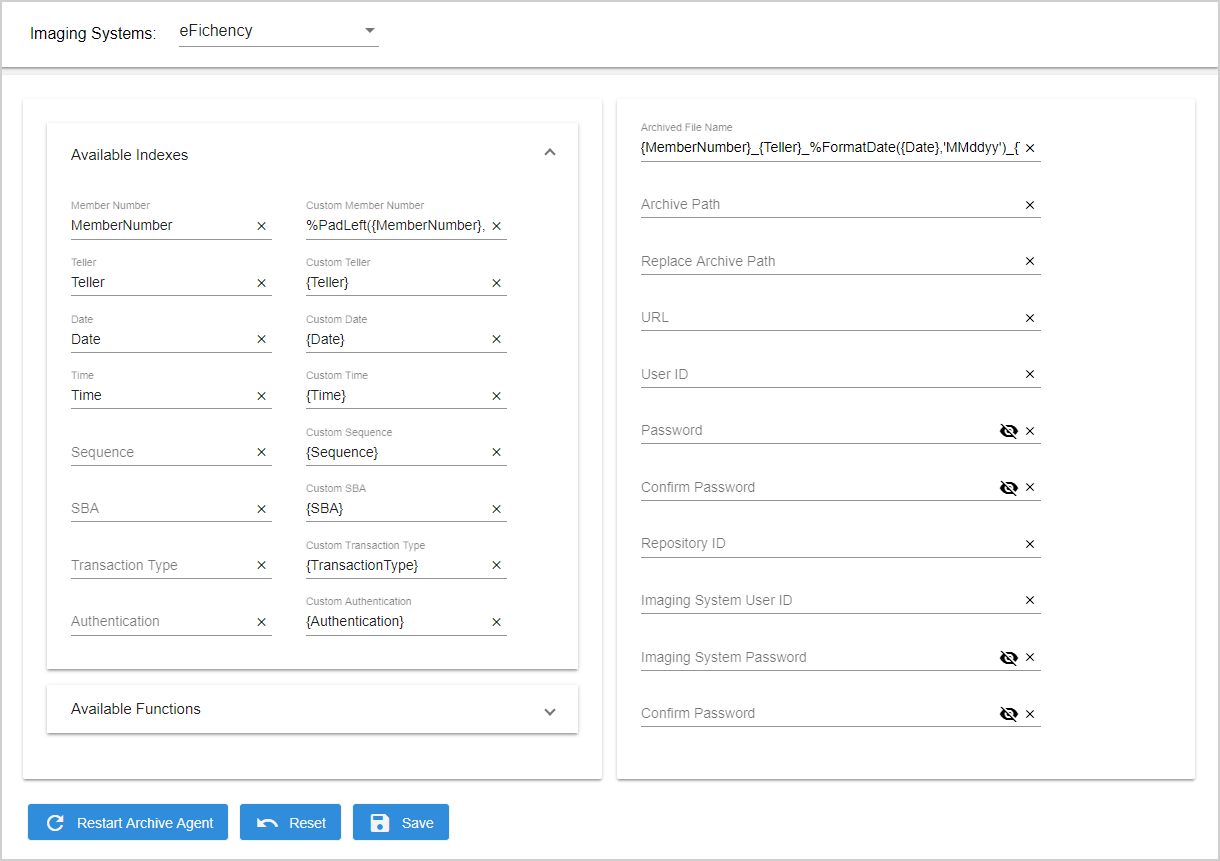
| Archived File Name | The PDF file name of the archived receipt. Index fields are listed in the order that they should appear in the file name of the PDF. Separators may be used to separate the index fields. Custom functions can be used on indexes to modify them. Use the GetCurrentDateTime function to prevent duplicate transactions. Refer to Available Functions for details. |
| Archive Path | N/A |
| Replace Archive Path | N/A |
| URL | API destination URL. |
| User ID | User ID of the defined user at the FI with permission to pass the Repository Name to the imaging system. |
| Password | User Password |
| Confirm Password | User Password |
| Repository ID | Storage area within the imaging system. |
| Imaging System User ID | User ID of the eFichency user with permissions to access the API. |
| Imaging System Password | Imaging System User ID User Password |
| Confirm Password | Imaging System User ID User Password |
The Galaxy imaging system generates a CSWL file and a PDF. The following optional indexes are mapped to the header fields: Document CUBranch, CUCode, DPDocID, Comments, DocumentDescription, DocumentType, DocumentGroup, and Origin. The available indexes are mapped to index element fields. For example, the customized name for member number is MemberNumber. Custom functions cannot be used with CU Code, CU Branch, Origin, or Comments. Sequence number is unique number of the receipt / generated by Galaxy to append to CDPDocID field to make it unique. When the sequence number is available in the data file, the sequence number is 9 digits: a 3-digit teller number and a 6-digit sequence number. For SBA transactions, the sequence number is 7 digits.
Note: If your imaging system requires MemberNo to be available in the <DocumentMembers> node, change the Member Number text field to MemberNo on the Available Indexes area.
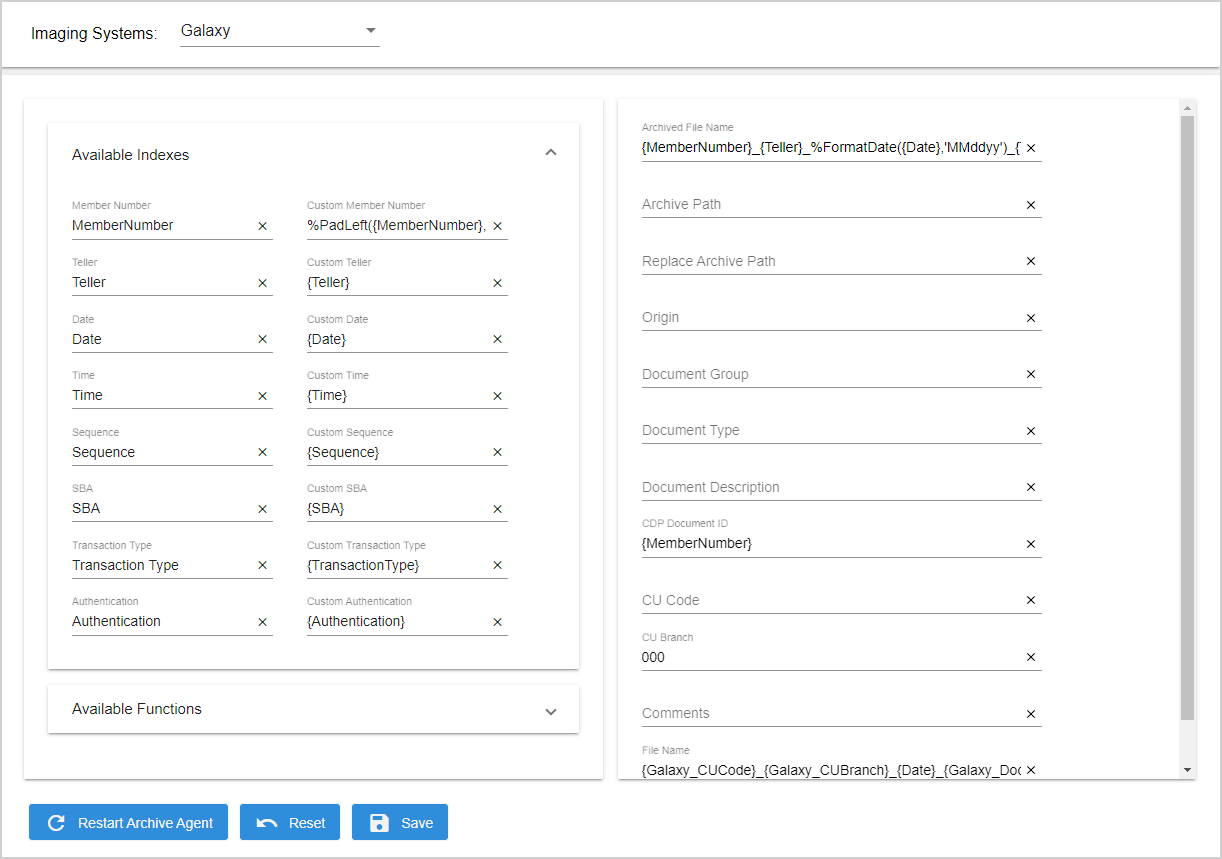
| Archived File Name | The PDF file name of the archived receipt. Index fields are listed in the order that they should appear in the file name of the PDF. Separators may be used to separate the index fields. Custom functions can be used on indexes to modify them. Use the GetCurrentDateTime function to prevent duplicate transactions. Refer to Available Functions for details. |
| Archive Path | The location where your imaging system will pick up the archived PDF. The folder will be created in the specified path by the Archive Agent during Archive Agent installation. UNC paths may be used. Folder should be have Read/Write permissions. If the Archive Path field is empty, then the PDFs will be created in this folder by default: %InstallPath%\eReceiptArchiveAgent\ArchivePDF. |
| Replace Archive Path |
In the index.xml file that is created during archiving, replace the Archive Path (e.g., E:\PDF) with a network path (e.g., \\eReceiptsServer\PDF). This is useful for anyone referring to the archived index.xml file to locate the archived PDF because the format of the path in the Archive Path field (e.g., E:\) may prevent users from accessing the path, such as when the Archive Path reflects a mapped location on a shared network that users may have mapped differently. Do not include the fully qualified domain name of the network path. For example, Archive Path is E:\PDF. You want the index.xml file to display "\\eReceiptsServer\" instead of "E:\". Then, the Replace Archive Path is E:\=\\eReceiptsServer\PDF. When the index.xml file is created, the PDF archive location is displayed as ''\\eReceiptsServer\PDF" instead of "E:\PDF". The physical location of the archived PDF and index.xml file does not change based on this setting. The PDF and index.xml file are still archived in the E:\PDF folder. |
| Origin | Defaults to blank. |
| Document Group | Defaults to blank. It is a document category. |
| Document Type | Defaults to blank. Document Type for each document. |
| Document Description | Defaults to blank. It will display as document title. |
| CDP Document ID | Defaults to Member Number. Unique document ID of 8 digits. |
| CU Code | Defaults to blank. Credit Union number. |
| CU Branch | Defaults to 000. Branch Number. |
| Comments | Defaults to blank. |
| File Name | Establishes the naming convention for the CSWL file. Only the underscore(_) or caret (^) are acceptable delimiters. File formats must be updated if any index fields are added, edited or deleted from eReceipts. Galaxy imaging system requires the index file name to be in a specific format with a specific file extension (.cswl). If the File Name field is formatted like this: {Galaxy_CUCode}_{Galaxy_CUBranch}_{Date}_ {Galaxy_DocumentType}_{Galaxy_CDPDocID}.cswl Then, this is an example of an output CSWL file name: cu0042_0003_20180719_4000_00400286.cswl |
Refer to the following example of a CSWL file opened in Excel.

ImageSoft outputs the indexes to index.txt.
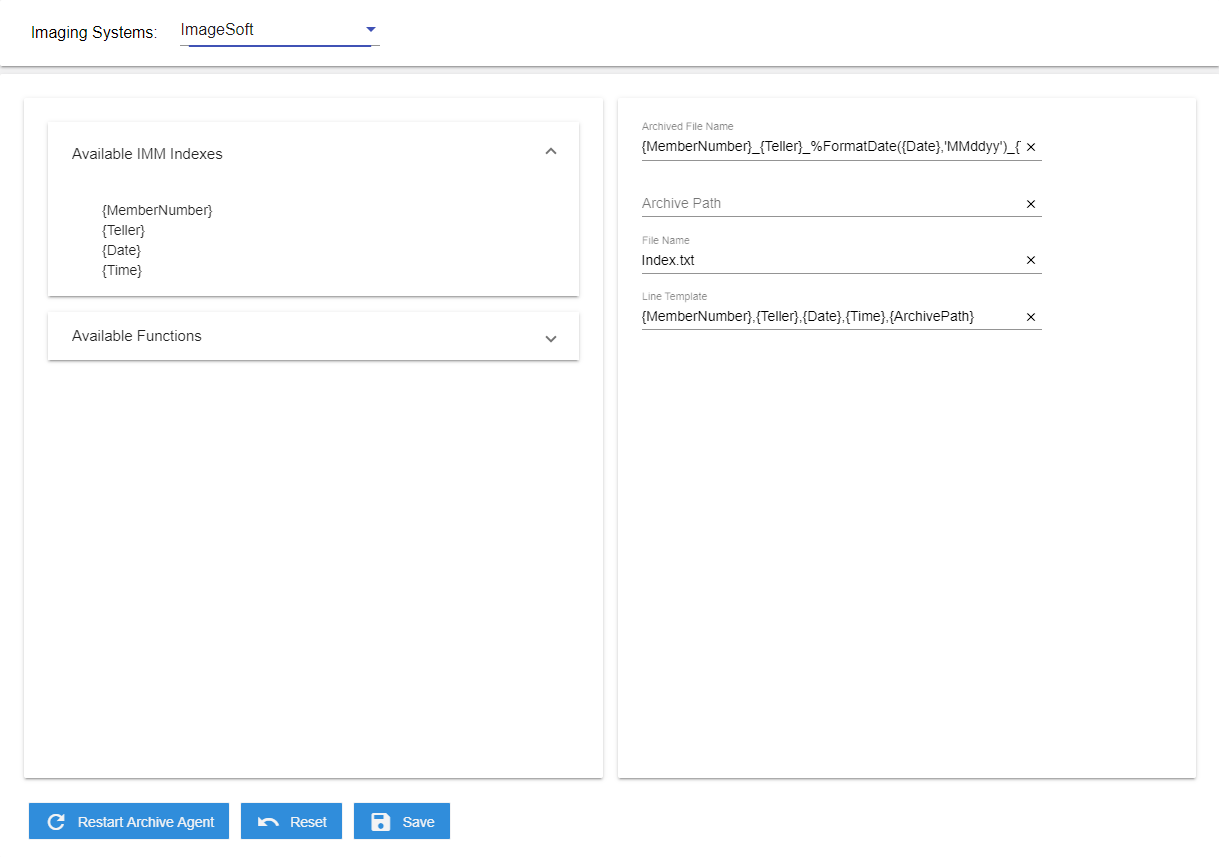
| Archived File Name | The PDF file name of the archived receipt. Index fields are listed in the order that they should appear in the file name of the PDF. Separators may be used to separate the index fields. Custom functions can be used on indexes to modify them. Use the GetCurrentDateTime function to prevent duplicate transactions. Refer to Available Functions for details. |
| Archive Path | The location where your imaging system will pick up the archived PDF. The folder will be created in the specified path by the Archive Agent during Archive Agent installation. UNC paths may be used. Folder should be have Read/Write permissions. If the Archive Path field is empty, then the PDFs will be created in this folder by default: %InstallPath%\eReceiptArchiveAgent\ArchivePDF. |
| File Name | The file type must be index.txt. |
| Line Template |
The line format within the index file (one line per document). This is used to create the records in the index file. The Line Template field can be used to customize the order of indexes. Index field names must include the braces “{}”. For example, “{MemberNumber}” is correct. “MemberNumber” will not function correctly. This is the default Line Template: {MemberNumber},{Teller},{Date},{Time},{ArchivePath} This template will produce a listing of all user index fields. The example values are: {MemberNumber}: 00000011 {Teller}: 320 {Date}: 1/25/2021 {Time}: 10:30:40 (hh:mm:ss) {ArchivePath}: E:\PDF The resulting line format in the index file is 00000011,320,012521,103040,E:\PDF\00000011_ 320_012521_103040.pdf. Use the Line Template field to replace the Archive Path (e.g., E:\PDF) with a network path (e.g., \\eReceiptsTestServer.immlab.com\) in the index file. This is useful for anyone referring to the archived index file to locate the archived PDF because the format of the path in the Archive Path field (e.g., E:\) may prevent users from accessing the path, such as when the Archive Path reflects a mapped location on a shared network that users may have mapped differently. For example, if the Line Template is {MemberNumber},{Teller},{Date},{Time},%ReplaceCharacters({ArchivePath}, 'E:\', '\\eReceiptsTestServer.immlab.com\'), the resulting line format in the index file is 00000011,320,012521,103040,\\eReceiptsTestServer.immlab.com\PDF\00000011 _320_012521_103040.pdf. |
Index style Imagio creates a ZIP file containing a PDF and an index.txt file. The ZIP file name is configured by the Zip File Name field. The index.txt file is a fixed-width, plain text file. Custom functions can be applied for Archived File Name, Line Template, and Zip File Name.
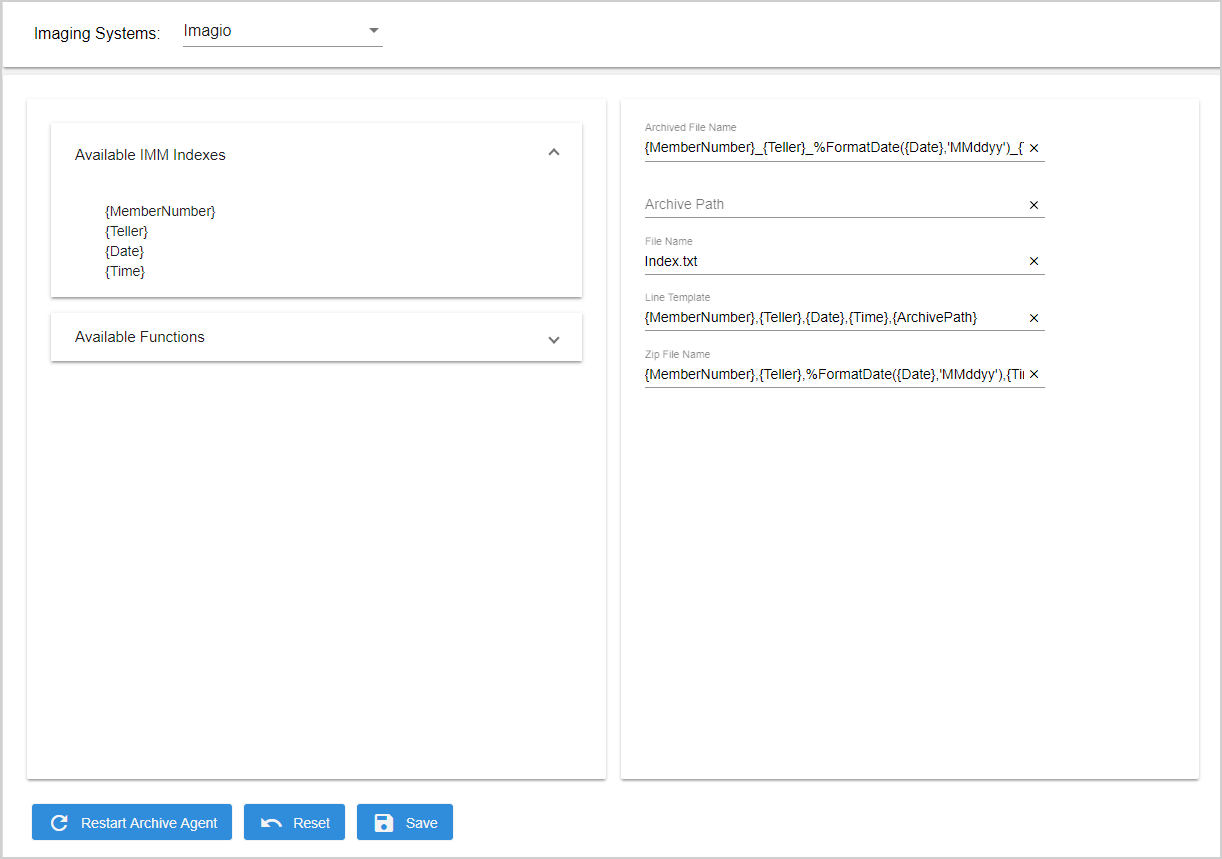
| Archived File Name | The PDF file name of the archived receipt. Index fields are listed in the order that they should appear in the file name of the PDF. Separators may be used to separate the index fields. Custom functions can be used on indexes to modify them. Use the GetCurrentDateTime function to prevent duplicate transactions. Refer to Available Functions for details. |
| Archive Path | The location where your imaging system will pick up the archived PDF. The folder will be created in the specified path by the Archive Agent during Archive Agent installation. UNC paths may be used. Folder should be have Read/Write permissions. If the Archive Path field is empty, then the PDFs will be created in this folder by default: %InstallPath%\eReceiptArchiveAgent\ArchivePDF. |
| File Name | The file type must be index.txt. |
| Line Template |
The line format within the index file (one line per document). This is used to create the records in the index file. The Line Template field can be used to customize the order of indexes. Index field names must include the braces “{}”. For example, “{MemberNumber}” is correct. “MemberNumber” will not function correctly. This is the default Line Template: {MemberNumber},{Teller},{Date},{Time},{ArchivePath} This template will produce a listing of all user index fields. The example values are: {MemberNumber}: 00000011 {Teller}: 320 {Date}: 1/25/2021 {Time}: 10:30:40 (hh:mm:ss) {ArchivePath}: E:\PDF The resulting line format in the index file is 00000011,320,012521,103040,E:\PDF\00000011_ 320_012521_103040.pdf. |
| Zip File Name | The ZIP file name format. For example, if this is the Zip File Name value: {MemberNumber},{Teller},%FormatDate({Date},'MMddyy'),{Time}.Zip And the example values are:
The resulting ZIP file name is: 00000011_320_012521_103040.zip |
A PDF and index.txt will be created.

| Archived File Name | The PDF file name of the archived receipt. Index fields are listed in the order that they should appear in the file name of the PDF. Separators may be used to separate the index fields. Custom functions can be used on indexes to modify them. Use the GetCurrentDateTime function to prevent duplicate transactions. Refer to Available Functions for details. |
| Archive Path | The location where your imaging system will pick up the archived PDF. The folder will be created in the specified path by the Archive Agent during Archive Agent installation. UNC paths may be used. Folder should be have Read/Write permissions. If the Archive Path field is empty, then the PDFs will be created in this folder by default: %InstallPath%\eReceiptArchiveAgent\ArchivePDF. |
| File Name | The file type must be index.txt. |
| Line Template |
The line format within the index file (one line per document). This is used to create the records in the index file. The Line Template field can be used to customize the order of indexes. Index field names must include the braces “{}”. For example, “{MemberNumber}” is correct. “MemberNumber” will not function correctly. This is the default Line Template: {MemberNumber},{Teller},{Date},{Time},{ArchivePath} This template will produce a listing of all user index fields. The example values are: {MemberNumber}: 00000011 {Teller}: 320 {Date}: 1/25/2021 {Time}: 10:30:40 (hh:mm:ss) {ArchivePath}: E:\PDF The resulting line format in the index file is 00000011,320,012521,103040,E:\PDF\00000011_ 320_012521_103040.pdf. |
The settings on this screen are dependent on the imaging system and become global settings for the FI. For this setup, eReceipts sends the indexes and archived PDFs to the Nautilus server using the Nautilus web service URL and user account. Nautilus integration uses Fiapi web service to import documents. The web service user account must have permission to import the document. Custom functions cannot be used with Web Service URL, Password, WebService User, or Confirm Password.
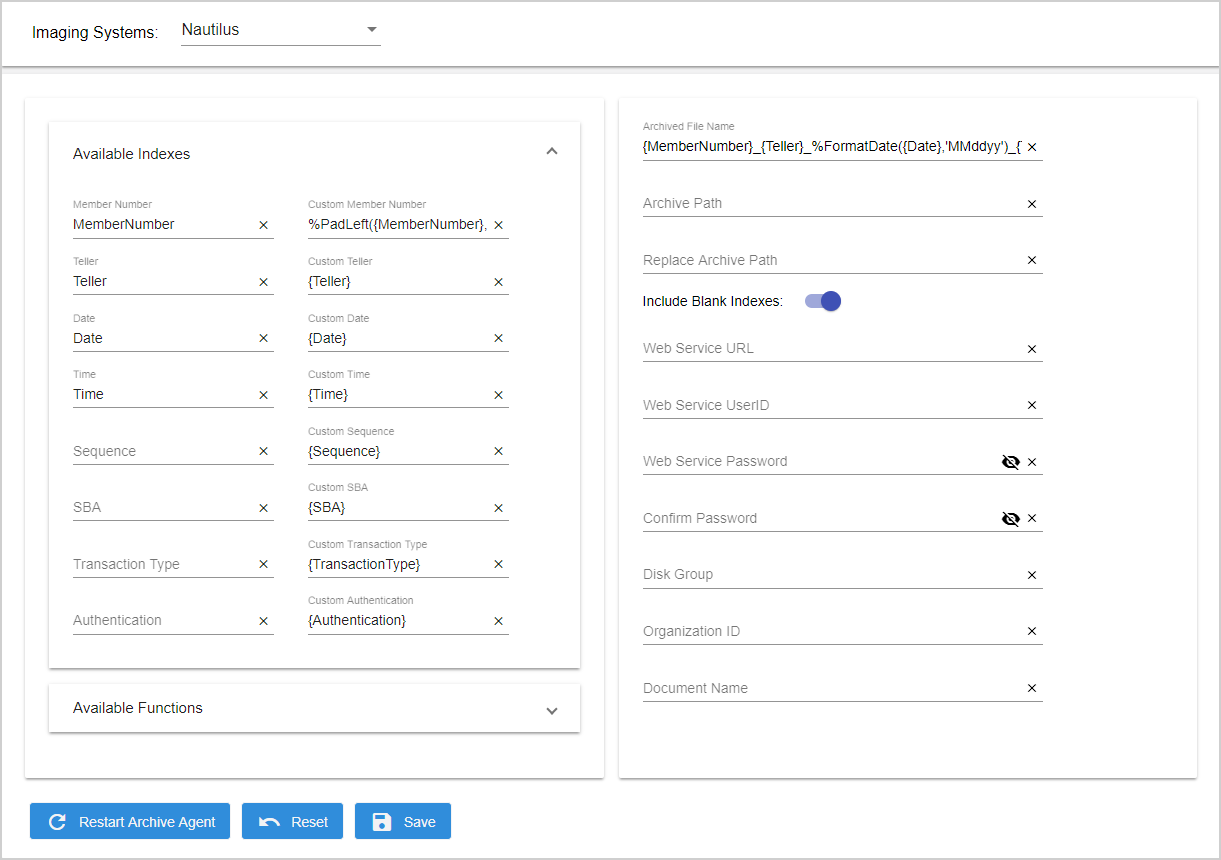
| Archived File Name | The PDF file name of the archived receipt. Index fields are listed in the order that they should appear in the file name of the PDF. Separators may be used to separate the index fields. Custom functions can be used on indexes to modify them. Use the GetCurrentDateTime function to prevent duplicate transactions. Refer to Available Functions for details. |
| Archive Path | N/A |
| Replace Archive Path | N/A |
| Include Blank Indexes | When enabled, include the index fields with blank values. |
| Web Service URL | Obtained from Nautilus. Service URL example: http://192.168.1.215/fiapi/pds1450.asmx |
| Web Service User ID | Obtained from Nautilus. |
| Web Service Password | Obtained from Nautilus. |
| Confirm Password | Obtained from Nautilus. |
| Disk Group | Obtained from Nautilus. |
| Organization ID | Obtained from Nautilus. |
| Document Name | N/A |
OTG outputs the indexes to index.txt.

| Archived File Name | The PDF file name of the archived receipt. Index fields are listed in the order that they should appear in the file name of the PDF. Separators may be used to separate the index fields. Custom functions can be used on indexes to modify them. Use the GetCurrentDateTime function to prevent duplicate transactions. Refer to Available Functions for details. |
| Archive Path | The location where your imaging system will pick up the archived PDF. The folder will be created in the specified path by the Archive Agent during Archive Agent installation. UNC paths may be used. Folder should be have Read/Write permissions. If the Archive Path field is empty, then the PDFs will be created in this folder by default: %InstallPath%\eReceiptArchiveAgent\ArchivePDF. |
| File Name | The file type must be index.txt. |
| Line Template | The line format within the index file (one line per document). This is used to create the records in the index file. The Line Template field can be used to customize the order of indexes. Index field names must include the braces “{}”. For example, “{MemberNumber}” is correct. “MemberNumber” will not function correctly. This is the default Line Template: {MemberNumber},{Teller},{Date},{Time},@{ArchivePath} This template will produce a listing of all user index fields. The example values are: {MemberNumber}: 00000011 {Teller}: 320 {Date}: 1/25/2021 {Time}: 10:30:40 (hh:mm:ss) {ArchivePath}: E:\PDF The resulting line format in the index file is 00000011,320,012521,103040, @E:\PDF\00000011_320_012521_103040.pdf. Use the Line Template field to replace the Archive Path (e.g., E:\PDF) with a network path (e.g., \\eReceiptsTestServer.immlab.com\) in the index file. This is useful for anyone referring to the archived index file to locate the archived PDF because the format of the path in the Archive Path field (e.g., E:\) may prevent users from accessing the path, such as when the Archive Path reflects a mapped location on a shared network that users may have mapped differently. For example, if the Line Template is {MemberNumber},{Teller},{Date},{Time},%ReplaceCharacters(@{ArchivePath}, 'E:\', '\\eReceiptsTestServer.immlab.com\'), the resulting line format in the index file is 00000011,320,012521,103040,@\\eReceiptsTestServer.immlab.com\PDF\00000011 _320_012521_103040.pdf. |
The ProfitStars Synergy imaging system creates both PDF and XML files. The XML file contains all of the indexing information for each archived transaction.
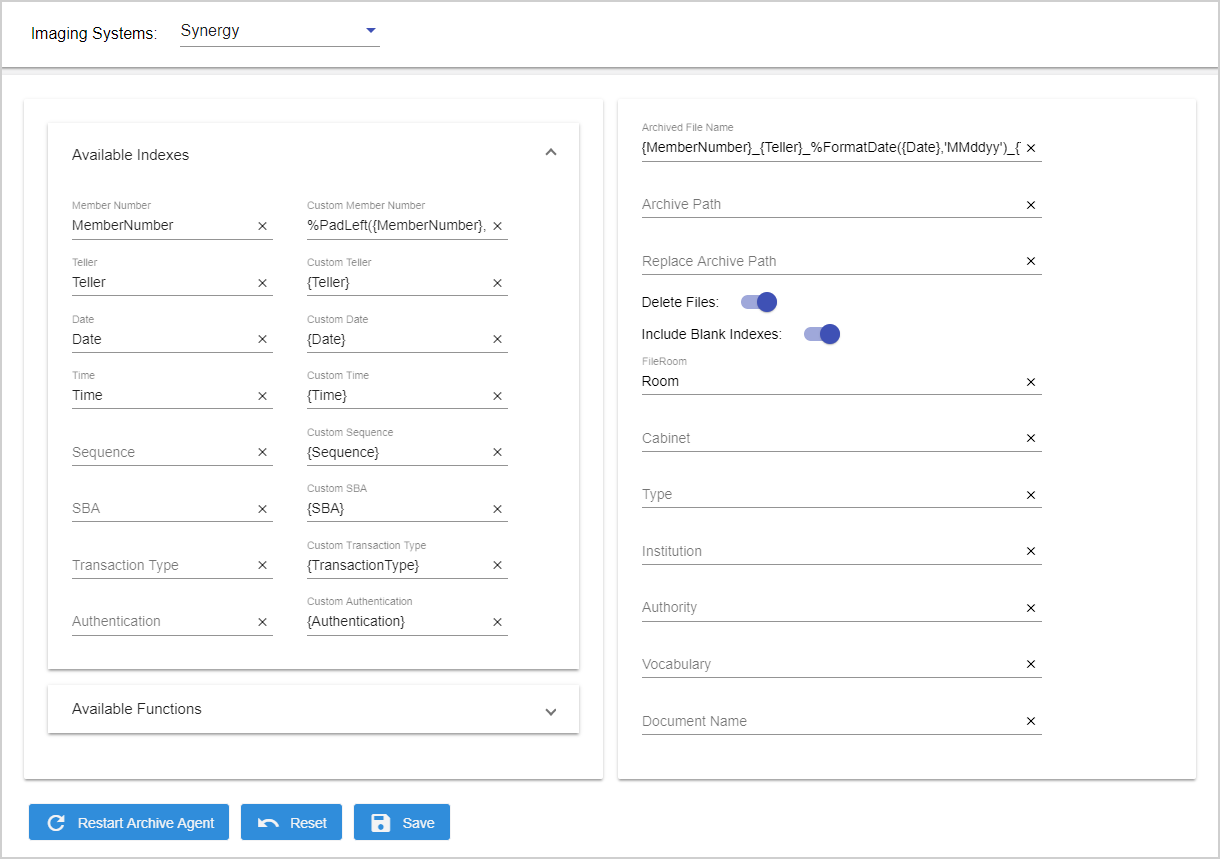
| Archived File Name | The PDF file name of the archived receipt. Index fields are listed in the order that they should appear in the file name of the PDF. Separators may be used to separate the index fields. Custom functions can be used on indexes to modify them. Use the GetCurrentDateTime function to prevent duplicate transactions. Refer to Available Functions for details. |
| Archive Path | The location where your imaging system will pick up the archived PDF. The folder will be created in the specified path by the Archive Agent during Archive Agent installation. UNC paths may be used. Folder should be have Read/Write permissions. If the Archive Path field is empty, then the PDFs will be created in this folder by default: %InstallPath%\eReceiptArchiveAgent\ArchivePDF. |
| Replace Archive Path |
In the index.xml file that is created during archiving, replace the Archive Path (e.g., E:\PDF) with a network path (e.g., \\eReceiptsServer\PDF). This is useful for anyone referring to the archived index.xml file to locate the archived PDF because the format of the path in the Archive Path field (e.g., E:\) may prevent users from accessing the path, such as when the Archive Path reflects a mapped location on a shared network that users may have mapped differently. Do not include the fully qualified domain name of the network path. For example, Archive Path is E:\PDF. You want the index.xml file to display "\\eReceiptsServer\" instead of "E:\". Then, the Replace Archive Path is E:\=\\eReceiptsServer\PDF. When the index.xml file is created, the PDF archive location is displayed as ''\\eReceiptsServer\PDF" instead of "E:\PDF". The physical location of the archived PDF and index.xml file does not change based on this setting. The PDF and index.xml file are still archived in the E:\PDF folder. |
|
Delete Files |
When enabled, PDF documents and XML files will be deleted from the imaging system destination location after being picked up by the imaging system. When disabled, PDF documents and XML files will not be deleted from the imaging system destination location after being picked up by the imaging system. |
| Include Blank Indexes | When enabled, include the index fields with blank values in the XML file. When disabled, do not include the index fields with blank values in the XML file. |
| FileRoom | Dependent on the ProfitStars Synergy system settings. Custom functions can be used. |
| Cabinet | Dependent on the ProfitStars Synergy system settings. Custom functions can be used. |
| Type | Dependent on the ProfitStars Synergy system settings. Custom functions can be used. |
| Institution | Specifies the document’s institution. If the institution value is empty or the tag is missing, then the default institution will be used. Dependent on the ProfitStars Synergy system settings. |
| Authority | Specifies the document’s authority attribute (1 through 9). When blank, the element will not be added to the XML. Dependent on the ProfitStars Synergy system settings. |
| Vocabulary | Dependent on the ProfitStars Synergy system settings. Custom functions can be used. |
|
Document Name |
N/A |
Refer to an example of an index.xml file:
<?xml version="1.0"?>
<FilingJob Vocabulary="Receipts ">
<Batch SeqNum="1">
<FileRoom>IMM</FileRoom>
<DeleteFiles>false</DeleteFiles>
<CreationSource>eReceipts</CreationSource>
<Document SeqNum="1">
<DocName>TEST DOC</DocName>
<Cabinet>ERW</Cabinet>
<Type>PDF</Type>
<Institution>LFU</Institution>
<Authority>123456</Authority>
<Indexes>
<Index Name="MemberNumber">123456777</Index>
<Index Name="Teller">1966</Index>
<Index Name="Date">1/25/2021</Index>
<Index Name="Time">104246</Index>
</Indexes>
<Pages>
<Page SeqNum="1">E:\Server Apps\Archive Agent\eReceiptArchiveAgent\ArchivePDF\123456777_1966_012521_104246.pdf</Page>
</Pages>
</Document>
</Batch>
</FilingJob>
The settings on this page are dependent on the True Image imaging system and become global settings for the FI. The field values on this page are used in populating the output XML. Contact your Imaging System Administrator for specific usage within your FI. Custom functions cannot be used with Title or Owner.
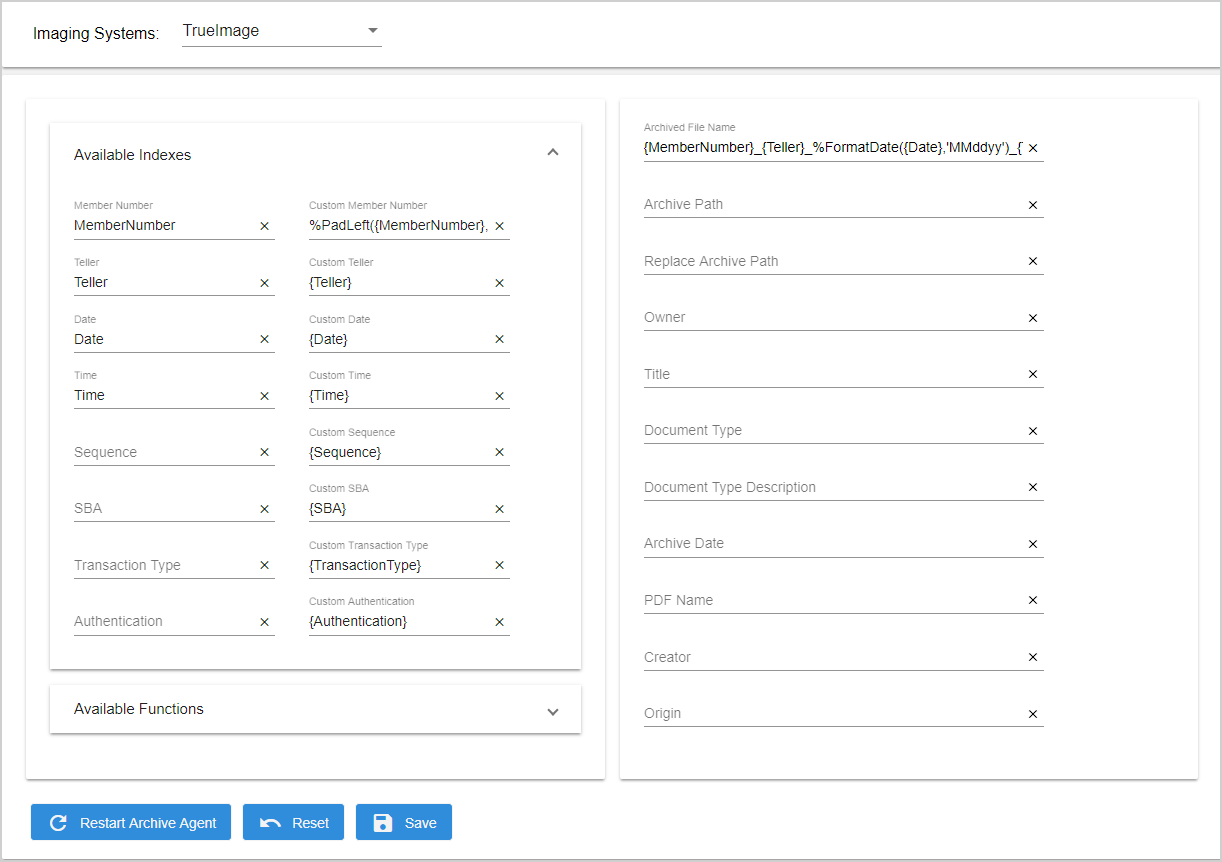
| Archived File Name | The PDF file name of the archived receipt. Index fields are listed in the order that they should appear in the file name of the PDF. Separators may be used to separate the index fields. Custom functions can be used on indexes to modify them. Use the GetCurrentDateTime function to prevent duplicate transactions. Refer to Available Functions for details. |
| Archive Path | The location where your imaging system will pick up the archived PDF. The folder will be created in the specified path by the Archive Agent during Archive Agent installation. UNC paths may be used. Folder should be have Read/Write permissions. If the Archive Path field is empty, then the PDFs will be created in this folder by default: %InstallPath%\eReceiptArchiveAgent\ArchivePDF. |
| Replace Archive Path |
In the index.xml file that is created during archiving, replace the Archive Path (e.g., E:\PDF) with a network path (e.g., \\eReceiptsServer\PDF). This is useful for anyone referring to the archived index.xml file to locate the archived PDF because the format of the path in the Archive Path field (e.g., E:\) may prevent users from accessing the path, such as when the Archive Path reflects a mapped location on a shared network that users may have mapped differently. Do not include the fully qualified domain name of the network path. For example, Archive Path is E:\PDF. You want the index.xml file to display "\\eReceiptsServer\" instead of "E:\". Then, the Replace Archive Path is E:\=\\eReceiptsServer\PDF. When the index.xml file is created, the PDF archive location is displayed as ''\\eReceiptsServer\PDF" instead of "E:\PDF". The physical location of the archived PDF and index.xml file does not change based on this setting. The PDF and index.xml file are still archived in the E:\PDF folder. |
|
Owner |
Owner |
| Title | Title |
| Document Type | An identifying string written into the TI document type tag. A custom function when defined allows more flexibility with replacement of index fields. Contact your Imaging System Administrator for to use this field. |
| Document Type Description | An identifying string written into the TI document type tag. A custom function when defined allows more flexibility with replacement of index fields. Contact your Imaging System Administrator for to use this field. |
| Archive Date | PDF archive date. This field is required. |
| PDF Name | The full name of the PDF. |
| Creator | The string added to the True Image creator tag type. The default value is IMM. Contact your Imaging System Administrator for to use this field. |
| Origin | The string added to the True Image origin tag type. The default value is eReceipts. Contact your Imaging System Administrator for to use this field. |
The following XML file is created after the PDF is successfully processed:
{MemberNumber}_{Teller}_%FormatDate({Date},'MMddyy')_{Time}.xml
900012_123456_031015_100833.xml
These are example contents of the XML file:
<Document>
<DocumentType></DocumentType>
<DocumentTypeDescription></DocumentTypeDescription>
<Title>Title</Title>
<ArchiveDate>2015-03-10</ArchiveDate>
<Creator>IMM</Creator>
<Owner>Owner</Owner>
<Origin>eReceipts</Origin>
<PDFName>222_123456_031015_100833.PDF</PDFName>
<DocumentPage>
<SearchTokens>
<MEMBERNUMBER>900012</MEMBERNUMBER>
<TELLERID>123456</TELLERID>
<DATE>2015-03-10</DATE>
<TIME>10:08:33</TIME>
</SearchTokens>
</DocumentPage>
</Document>