Member Import / Account Import
Note: Depending on your type of institution, you will see "Member Import" or "Account Import" used in the portal. "Member Import" will be used throughout this documentation except where noted. "Member" will be used for "member" and "account" throughout this documentation except where noted.
The Member Import or Account Import feature gives tellers the latest consumer information. Instead of tellers manually entering emails and phone numbers (if applicable) for each consumer over and over again in eReceipts, they can use the latest data taken directly from your core. Configure member/account import to be done on demand or on a schedule. If you do not want to retain member/account information, which will require tellers to enter consumer information manually for every transaction, do not use the Member Import / Account Import feature and do not assign the member management role to tellers. Refer to Roles for details about assigning permissions/roles.
From the Member Import or Account Import page, import consumers on demand or create a schedule to import consumers. On the Admin Dashboard page, click Member Import / Account Import, or click Administration > Member Import / Account Import from the menu to open the Member Import or Account Import page.
Stop: If you import a CSV file, the existing consumer information is deleted and replaced with the member/account information in the new CSV file. If you cancel the import while it is running, all of the member or account information is deleted from eReceipts.
Create a CSV File
Consumer information is stored in a CSV file on the Member Import Agent / Account Import Agent server. The CSV file is then used to import the latest member or account information into eReceipts. It is not recommended to import more than 500,000 records at a time.
The CSV file must have these fields in this order:
| # | Field Name | Required | Description |
|---|---|---|---|
| 1 | Member Number | Yes | The member's number. There can be up to 10 Member Number entries for each member number. If there are more than 10 duplicate member number records, only the first 10 will be imported. If the member number is empty, the account number is set as the member number. If both member number and account number are empty, it is an invalid record. Alphanumeric characters are supported. |
| 2 | Member First Name | One of these is required: Member First Name, Member Last Name, or Member Full Name. | The consumer's first name. If Member Full Name is not empty, the Member Full Name will be imported while Member First Name and Member Last Name are ignored. Otherwise, Member First Name and Member Last Name will be merged to form the full name. Alphanumeric characters are supported. Commonly used special characters are supported except commas (,) and quotation marks ("). |
| 3 | Member Last Name | One of these is required: Member First Name, Member Last Name, or Member Full Name. | The consumer's last name. If Member Full Name is not empty, the Member Full Name will be imported while Member First Name and Member Last Name are ignored. Otherwise, Member First Name and Member Last Name will be merged to form the full name. Alphanumeric characters are supported. Commonly used special characters are supported except commas (,) and quotation marks ("). |
| 4 | Member Full Name | One of these is required: Member First Name, Member Last Name, or Member Full Name. | The consumer's full name. If Member Full Name is not empty, the Member Full Name will be imported while Member First Name and Member Last Name are ignored. Otherwise, Member First Name and Member Last Name will be merged to form the full name. Alphanumeric characters are supported. Commonly used special characters are supported except commas (,) and quotation marks ("). |
| 5 | No | The consumer's email address. Email addresses must be valid. Email addresses support alphanumeric characters, the at symbol (@), and periods. | |
| 6 | Phone Number | No | The consumer's phone number. Numbers and parentheses are supported. Phone numbers must be formatted as (XXX) YYY-ZZZZ or (XXX)YYY-ZZZZ. If the format of the phone number is incorrect, it is treated as invalid. Sending text message notifications to members is an optional, paid feature and may not apply to you; however, the Phone Number field can still be present in your CSV file. |
| 7 | Member Suffix | No | Name suffixes such as Jr., Sr., III, PhD., etc. Alphanumeric characters and periods are supported. |
| 8 | Account Number | No | The consumer's account number (alphanumeric). If the Member Number field is empty, the account number is set as the member number. If both member number and account number are empty, it is an invalid record. |
Additional notes:
- Unsupported characters are filtered from the data.
- Invalid records are not imported. If invalid records are found, refer to the InvalidRecords.csv file in the Member Import Agent / Account Import Agent logs folder. Refer to Agents for more information about the Member Import Agent / Account Import Agent and the Logs folder location.
- If you do not have an email address for an individual, the individual should be imported into eReceipts as a placeholder so personnel can easily add the email address without creating a new record.
- Only one phone number and one email address are allowed for each line.
- When there are multiple individuals on an account, the text file should contain a row for each individual.
This is an example:

This is an example of two individuals sharing one account:

Update Your CSV File
If member/account information was updated in the Teller Portal, it will not be included in the CSV file from your core system. You must manually update your CSV file from your core system with all of the latest member/account information before importing member/account information from the CSV file. When importing member/account information, your existing member/account information will be deleted and replaced with the data from the new CSV file. If member/account information was added or updated in the Teller Portal but not manually added to the CSV file from your core system, that member/account information will be deleted when the new CSV file is imported.
Confirm Folder Permissions Are Correct
The file path can be a network path or local path for both On Demand and Schedule imports. You must have Read permissions for the folder where the CSV file is located and Read/Write/Modify permissions for the logging path.
Confirm the Agent Is Running and Configured Correctly for Logging
Refer to Agents for more information about the Member Import Agent / Account Import Agent and how to change the Logs folder location.
-
Confirm that the Member Import Agent / Account Import Agent is running before importing the CSV file.
-
Confirm the location of the Logs folder for the Member Import Agent / Account Import Agent. If some entries in the CSV file are incorrect, such as a missing phone number, the import does not stop. Logs contain information regarding invalid or duplicate records and an InvalidRecords.csv file is created. The logs are created in the Logs folder for the Member Import Agent / Account Import Agent.
From the On Demand tab, import member/account information as needed on demand. Enter the location of the CSV file containing the member information in the File Location field. Then, click Import. Click Clear to clear any entries in the File Location field.
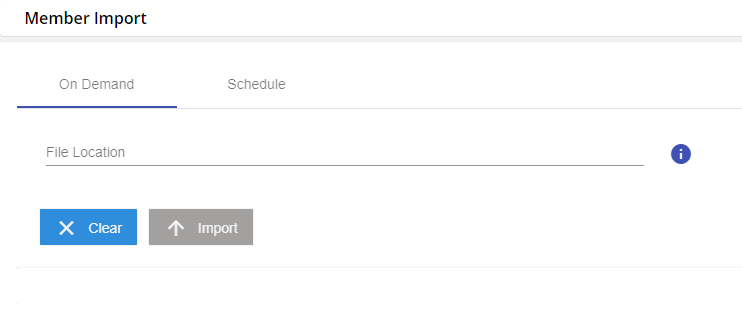
After Import is clicked, a status bar is displayed. To cancel the import process, click Cancel Import. The total records count, successfully uploaded records count, invalid file count, and duplicate file count are shown.
Note: If entries in the CSV file are invalid or duplicate, the import continues with the rest of the records. Logs contain information regarding invalid/duplicate records and an InvalidRecords.csv file is created. The logs are created in the Logs folder for the Member Import Agent / Account Import Agent. Refer to Agents for more information about the Member Import Agent / Account Import Agent and how to change the Logs folder location.
Note: If the server is down or if there is a server issue during import, issues are logged in the member/account import log file. The member/account import must be done again.
Note: If attempting to perform an on-demand member/account import while another on-demand member/account import is already running, a message is displayed: Request canceled. Another import is still running!
Note: When a scheduled member/account import task is running, on-demand member/account import cannot be done.
Note: When a scheduled member/account import task is triggered, the Member Import Agent / Account Import Agent stops any running on-demand member/account import tasks. If any records were imported while the on-demand member/account import task was running, those records are deleted and the scheduled member/account import task starts again.
Note: If Cancel Import is clicked during the import process, the current import is stopped and you will be prompted to confirm that you wish to cancel. If you proceed with canceling the import, the import process is ended and there will be zero member records available in eReceipts.
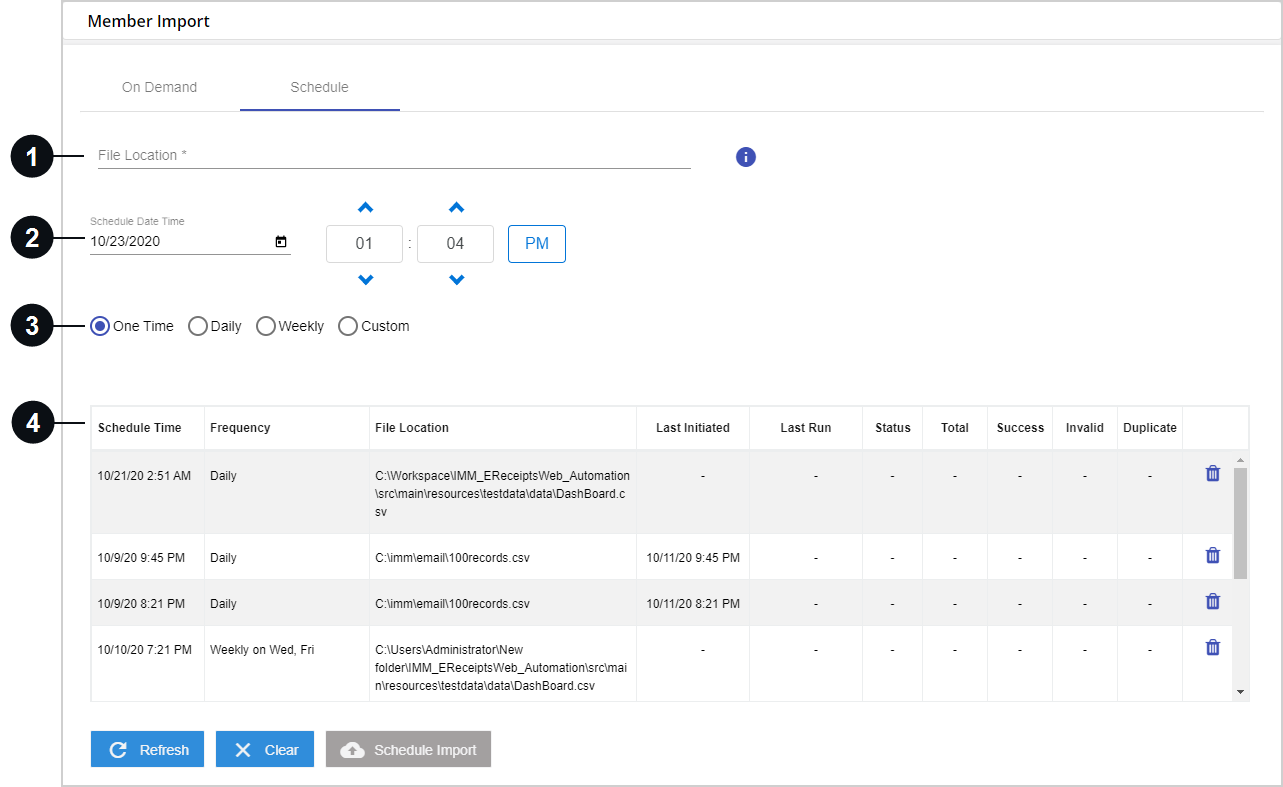
From the Schedule tab, import member/account information on a schedule. When all of the fields are populated and you ready to schedule the import, click Schedule Import. Click Refresh to refresh the scheduled import tasks table. Click Clear to clear the File Location field and to reset the Hours and Minutes in the Schedule Date Time area to the default values. Up to 10 scheduled member/account import tasks can be created. If there are 10 scheduled member/account import tasks and you wish to add one more, you must delete an existing task before proceeding. Refer to the following details.

|
File Location | Enter the location of the CSV file containing the member/account information in the File Location field. |

|
Scheduled Date Time | Manually enter the date that you would like the first scheduled import to occur, or click the Calendar icon to view the Calendar and select a date. By default, today's date is populated in the field. In the Hours and Minutes fields, manually enter the time you would like the first scheduled import to occur or use the up and down arrows. By default, the Hours and Minutes fields are set one minute ahead of the time that Member Import or Account Import page loads. |

|
Schedule Frequency | Select how often you would like the import to occur. The first (or only) scheduled import will be at the date and time entered in the Scheduled Date Time field. Subsequent scheduled imports will occur at the time entered in the Scheduled Date Time field.
|

|
Scheduled Import Table |
All scheduled import tasks are displayed in this table. Click the Delete  icon next to the scheduled import task to delete the task. The columns contain the following information: icon next to the scheduled import task to delete the task. The columns contain the following information:
|
Note: Occasionally, scheduled member/account import tasks may stop running. Check the Last Initiated and Last Run information in the Scheduled Import Table. If Last Initiated and Last Run information is not updated as it should be based on the schedule, delete the existing member/account import task and schedule a new member/account import task.
Note: If entries in the CSV file are invalid or duplicate, the import continues with the rest of the records. Logs contain information regarding invalid/duplicate records and an InvalidRecords.csv file is created. The logs are created in the Logs folder for the Member Import Agent / Account Import Agent. Refer to Agents for more information about the Member Import Agent / Account Import Agent and how to change the Logs folder location.
Note: If the server is down or if there is a server issue during import, issues are logged in the member/account import log file. The member import must be done again.
Note: If a member/account import task is scheduled to run at the same time and date as an existing, currently running scheduled member/account import task, the new task is canceled and the existing task continues.
Note: If a scheduled member/account import task is running and another scheduled member/account import task is initiated, the currently running task continues and the second task is stopped before it starts to run.
Note: When a scheduled member/account import task is triggered, the Member Import Agent / Account Import Agent stops any running on-demand member import tasks. If any records were imported while the on-demand member import task was running, those records are deleted and the scheduled member import task starts again.
Note: When a scheduled member import task is running, on-demand member import cannot be done.
Note: If you refresh the Member Import / Account Import page during import, the fields are reset or cleared and the page is reset even though the member import is running in the background. The file name will not be displayed in the notification when the member/account import is finished.