Settings
The Settings window allows you to change some of the default workstation settings for eReceipts. When the Settings menu option is clicked, the Settings window pops up over the Teller Portal. Click the Edit button to enter and exit Edit Mode. When the button is blue, you are in Edit Mode. When the button is green, you are not in Edit Mode. Depending on your environment, some of the settings displayed here may not be applicable to you.

Click the Print, Sign, or Scan tab to access the relevant settings. By default, the Print tab is selected and the Receipt settings are expanded. Click the green Edit button to enter Edit Mode, which allows you to make changes to the settings. When you are in Edit Mode, the Edit button is blue. Changes are automatically saved and a notification briefly appears at the bottom of the Teller Portal to confirm. To exit Edit Mode, click the blue Edit button. To exit the Settings window, click outside the Settings window in the Teller Portal. Depending on your permissions, not all settings may be available.
Configure printer settings. To expand and collapse the Print tab options, use the up  and down
  arrows.
Note: Select and configure a printer before printing a receipt or report. Prior to printing, confirm that the selected printer is connected to the workstation.
Note: Depending on the scaling settings of a Windows 10 tablet, images may appear small or the date and time may be cut off. It is recommended to set scaling to 125% or less.
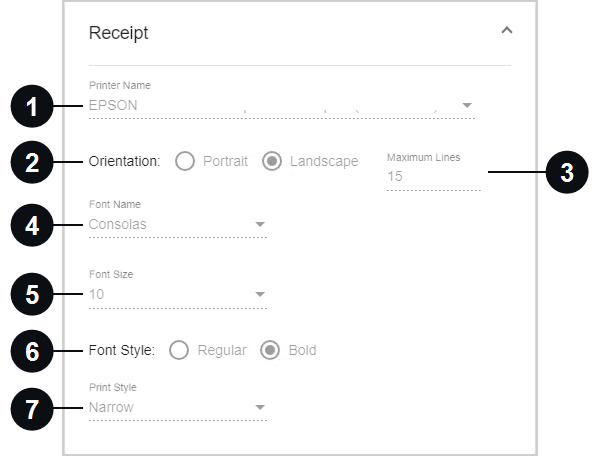
Configure the settings for printing receipts. Refer to Print Receipts for details about printing receipts.

|
Printer Name | Select a printer from the dropdown list. |

|
Orientation | View the receipt orientation: Portrait or Landscape. This configuration is not editable. |

|
Maximum Lines | Set the maximum number of lines printed on one receipt. This setting is visible when landscape orientation is selected. Up to 24 lines are supported on a printed receipt. |

|
Font Name | Select a font from the dropdown list. The selected font must be installed on the client machine. Using Arial and Times New Roman for the receipt font may result in misaligned data. |

|
Font Size | Select a font size from the dropdown list. It is recommended to use font size 8 for narrow receipts. |

|
Font Style | Select the style of the font: Regular or Bold. |
|
|
Print Style | Select the print style based on your printer paper: Narrow or Wide. There are two widths of receipt-style paper: Narrow: 3 1/8 and Wide: 4 3/8 (TSP800 only). The print style is wide by default. |
Configure the settings for printing reports.

|
|
Printer Name | Select a printer from the dropdown list. |
|
|
Orientation | Select the report orientation: Portrait or Landscape. The default selection is applicable for your host. Contact IMM Support before changing this setting. |
|
|
Font Name | Select a font from the dropdown list. The selected font must be installed on the client machine. |
|
|
Font Size | Select a font size from the dropdown list. |
|
|
Font Style | Select the style of the font: Regular or Bold. |
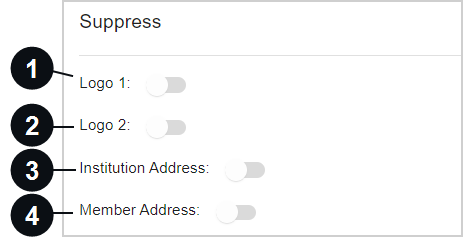
View the settings for suppressing content on printed receipts and archived PDF files as set by your administrator.
|
|
Logo 1 | Hide the first logo on printed receipts. If Logo 1 is suppressed, it will still be displayed on archived receipts, emailed receipts, and text message receipts. |
|
|
Logo 2 | Hide the second logo on printed receipts. If Logo 2 is suppressed, it will still be displayed on archived receipts, emailed receipts, and text message receipts. |
|
|
Institution Address | The financial institution's address will not print on the consumer's receipt. |
|
|
Member Address / Account Address | This address will not be displayed on the printed receipt. In addition, the address will not be displayed on receipts sent by email or text message. The address will be displayed on the eReceipts transaction page and on the archived receipt. |
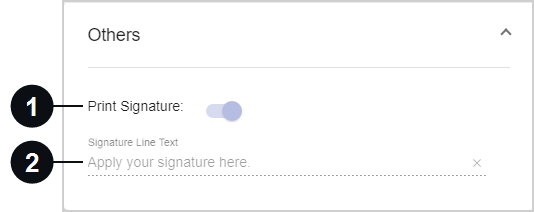
View additional printing settings. Tellers are unable to edit these settings.
|
|
Print Signature | If the signature is captured electronically, it will be included on the printed receipt. |
|
|
Signature Line Text | This is the text that is displayed under the signature line of a receipt. |
Configure settings that are specific to your host.

| Print Disbursements |
When enabled, the record of cash received and disbursed during a transaction is printed on the receipt in the format of a grid. When disabled, the grid is hidden from printed receipts to save space on the receipt paper. The grid will always be visible on receipts that are emailed, sent as a text message, or archived. If cash is neither received nor disbursed during a transaction, the grid is not displayed on any type of receipt. Refer to Transactions for details about the Received / Disbursed card on the transaction page of the Teller Portal. |
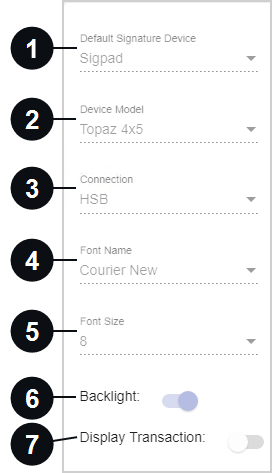
Set the default signature device and configure applicable signature settings.
When Sigpad is selected, the default signature device is a signature pad (sigpad). Restart eReceipts Client if any changes are made.
|
|
Default Signature Device | Select the default signature device: Sigpad (signature pad). |
|
|
Device Model | Select the type of signature pad device: Topaz 1x5, Topaz 4x5, or Topaz 5x7. eReceipts Client must be restarted if this setting is changed. |
|
|
Connection | Choose your signature pad connection type. eReceipts Client must be restarted if this setting is changed. |
|
|
Font Name | View the signature pad display font. This configuration is not editable. |
|
|
Font Size | View the signature pad display font size. This configuration is not editable. |
|
|
Backlight | Configure the backlight on the signature pad to always stay on. If not selected, the backlight will turn off after 10 seconds. This option is for use with 4×5 and 5×7 signature pads only. |

|
Display Transaction | Allow members to view the transaction on the signature pad. This option is for use with 4×5 and 5×7 signature pads only. Do not enable the Display Transaction setting for non-LCD signature pads. |
When Touch is selected, the default signature device is a touch screen device.

When Tablet is selected, the default signature device is a tablet.

When Remote Sign is selected, the default signature device is the customer's personal device (smartphone). eReceiptsPlus is an optional, paid feature and may not be applicable to your environment.

When Verifast is selected, the default signature device is a Verifast device. The use of a Verifast device is an optional, paid feature and may not be applicable to your environment.

Configure scanner settings. Restart eReceipts Client if any changes are made.

|
|
Scanner Type |
Select the type of scanner from the dropdown list. If Ranger is selected, these fields are displayed:
If any other selection is made besides Ranger, this field is displayed:
|
|
|
USB Connection | If the scanner is connected via USB, enable this setting. If the scanner is not connected via USB, disable this setting. |
|
|
Scanner IP | This is the scanner's IP address. This setting is only applicable if the USB Connection setting is disabled. Only IPv4 format is supported. |
|
|
Auto Stop Scan Upon Exit | When enabled, the scanner is automatically stopped after every scan. This prevents the scanner from being unavailable for other transactions and applications. When disabled, the scanner must be manually stopped after use. |
|
|
Scanned Image Max File Size in KB and Scanned Image Scaling Factor | Customize these settings to improve scanned image quality. These settings do not apply to scanned IDs. Click the Revert to Default icon next to the field to replace the existing value with the default value.
|
|
|
Scanned ID Max File Size in KB and Scanned ID Scaling Factor | Customize these settings to improve the image quality of scanned IDs. Click the Revert to Default icon next to the field to replace the existing value with the default value.
|
|
|
Enable eTeller CK21 Integration | When enabled, eTeller Check21 can be used. Refer to IMM eTeller Check21 for details. If you do not have an eTeller Check21 subscription, this setting will not be visible. Note: If eTeller Check21 is uninstalled, this setting must be manually disabled. |
|
|
eTeller CK21 Mode | Determine how your institution uses eTeller Check21 in your environment: integrated or non-integrated. When eTeller Check21 is integrated, eTeller Check21 is launched and managed by the core/host system. When eTeller Check21 is non-integrated, eTeller Check21 is launched when a Check 21 transaction is processed by eReceipts. This setting is editable if the Enable eTeller CK21 Integration setting is enabled. If you do not have an eTeller Check21 subscription, this setting will not be visible. Note: Bonds and offline transactions will be processed in non-integrated mode regardless of this setting. SBA transactions will be processed in non-integrated mode by default but can be configured for integrated mode by an administrator. |
|
|
Display message when archiving without eTeller Check21 Images | Sometimes a teller might archive a transaction before the eTeller Check21 images have loaded. When this setting is enabled, the teller is notified that the eTeller Check21 images might be missing and given options to proceed: "eTeller Check21 images are not found! Click Retry to try loading the check images again. If retry is unsuccessful, review the Transaction History from the client menu for errors and reprocess as needed. Click Continue to archive without images." When disabled, the teller is not notified that eTeller Check21 images are missing from the transaction before archiving. |


Note: When hardware settings and certain eReceipts Client settings are edited during working hours, the changes automatically go into effect in an hour. To immediately apply the changes, restart the Teller Portal from the eReceipts Client system tray icon.