Using eReceipts Client
The eReceipts Client is an application that is installed on a teller's workstation. eReceipts Client communicates between the workstation and the Teller Portal.
When eReceipts Client is installed, the eReceipts Client system tray icon is displayed in the workstation's system tray and the Teller Portal is automatically launched. The Teller Portal is the user interface for tellers. Users must sign in with their Microsoft Active Directory credentials. The system tray must be enabled for users in Group Policy to have access to the eReceipts Client system tray icon.
When the eReceipts Client is launched for the first time, the Teller Portal opens to the Dashboard page. The Teller Portal launches whenever a receipt is generated if the eReceipts Client is running on the workstation. When a receipt is generated, the Teller Portal opens to the Transactions page. Refer to Using the Teller Portal for details about the Teller Portal.
When eReceipts Client is running, the eReceipts Client ![]() system tray icon is displayed. When the dollar symbol is green, the eReceipts Client is connected to the eReceipts Server successfully. When the dollar symbol is red, the eReceipts Client is not connected to the eReceipts Server and/or an error occurred while creating a transaction. When the dollar symbol is yellow, the eReceipts Client is attempting to connect to the eReceipts Server.
system tray icon is displayed. When the dollar symbol is green, the eReceipts Client is connected to the eReceipts Server successfully. When the dollar symbol is red, the eReceipts Client is not connected to the eReceipts Server and/or an error occurred while creating a transaction. When the dollar symbol is yellow, the eReceipts Client is attempting to connect to the eReceipts Server.
Note: If the eReceipts Client system tray icon has a red warning icon  , one or more transactions failed to be created. Open the Transaction History window from the eReceipts Client menu to manage data files.
Click the eReceipts Client icon to view the eReceipts Client menu. The top of the menu displays the account that is logged in and the server connection. Select one of the menu items. Not all menu items shown here will be applicable to you.
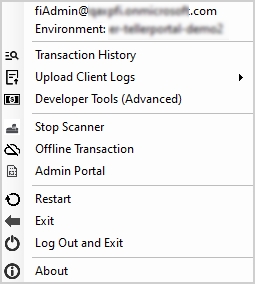
 Transaction History
Open the Transaction History window to view the backed up eReceipts and eTeller Check21 (if applicable) transaction data files. From the Transaction History window, search for, view, manage, and print data files. The use of 8.5 x 11-inch paper is required for printing. In addition, upload data files to eReceipts cloud for troubleshooting if needed. Refer to Transaction History for details.
 Upload Client Logs
Upload the eReceipts client logs and the eReceiptsClient.exe.config file to a secure cloud location when an issue occurs. The files are automatically packaged in a .zip file before being uploaded. Once the issue is reported, the Support Team will access the .zip file directly and begin the troubleshooting process. Select Recent Logs to upload logs from the last 48 hours. Select All Logs to upload all logs in the workstation logs folder (%InstallPath%\ws\%WorkstationName%\Logs).
 Developer Tools (Advanced)
When troubleshooting mode is enabled, this option will be visible to assist the Support Team.
 Stop Scanner
If a Ranger scanner is running, Stop Scanner is shown on the eReceipts Client menu. Clicking Stop Scanner will stop the Ranger application and the Ranger icon will disappear. If a scanner is not stopped, it is not available to other applications.
 Offline Transaction
If the Offline Transaction feature is enabled, the eReceipts Client menu displays the Offline Transaction menu item. Click Offline Transaction to open the Offline Transactions page in the Teller Portal. If your host/core system becomes unavailable, the Offline Transaction feature lets you record transaction data and continue processing transactions using the Teller Portal. This feature may not be applicable to your installation. Refer to Offline Transactions for details.
 Admin Portal
If a user has both teller and administrative roles, the eReceipts Client menu displays the Admin Portal menu item. Clicking the Admin Portal menu item opens the Admin Portal. The Admin Portal is the user interface where administrative tasks are performed.
Note: For administrators to access the eReceipts Client and Teller Portal, the administrator must also have the Teller or Super Teller roles.
Note: A group with the Role Admins role must also have the Institution Admins role to access the Admin Portal from the eReceipts Client.
Note: If you are using the eReceipts Client system tray icon to navigate to the Admin Portal, you will be prompted to enter your Microsoft AD credentials twice if the eReceipts Client is not launched yet: once for the eReceipts Client and once for the Teller Portal (UI). If eReceipts Client is not launched yet, the eReceipts Client system tray icon will not be in the system tray. After the eReceipts Client is launched and the Teller Portal opens, navigate to the Admin Portal using the eReceipts Client system tray icon. You will not be prompted to enter your credentials again to open the Admin Portal. Refer to Signing In to eReceipts for details about signing in to eReceipts.
 Restart
Click Restart to exit and relaunch eReceipts Client. Use this option to get the latest changes from the server, recover eReceipts if the application is unresponsive, or to resolve issues due to network disruptions. If the Teller Portal is open, the Teller Portal will be closed and launched again.
 Exit
Exit
Click Exit to close the Teller Portal
 Log Out and Exit
Click the Log Out and Exit menu item to log out of the eReceipts Client, Teller Portal, and Admin Portal (if applicable). If open, the Teller Portal
 About
About
Click About to open a pop-up window that lists the version number and copyright information.