Transactions
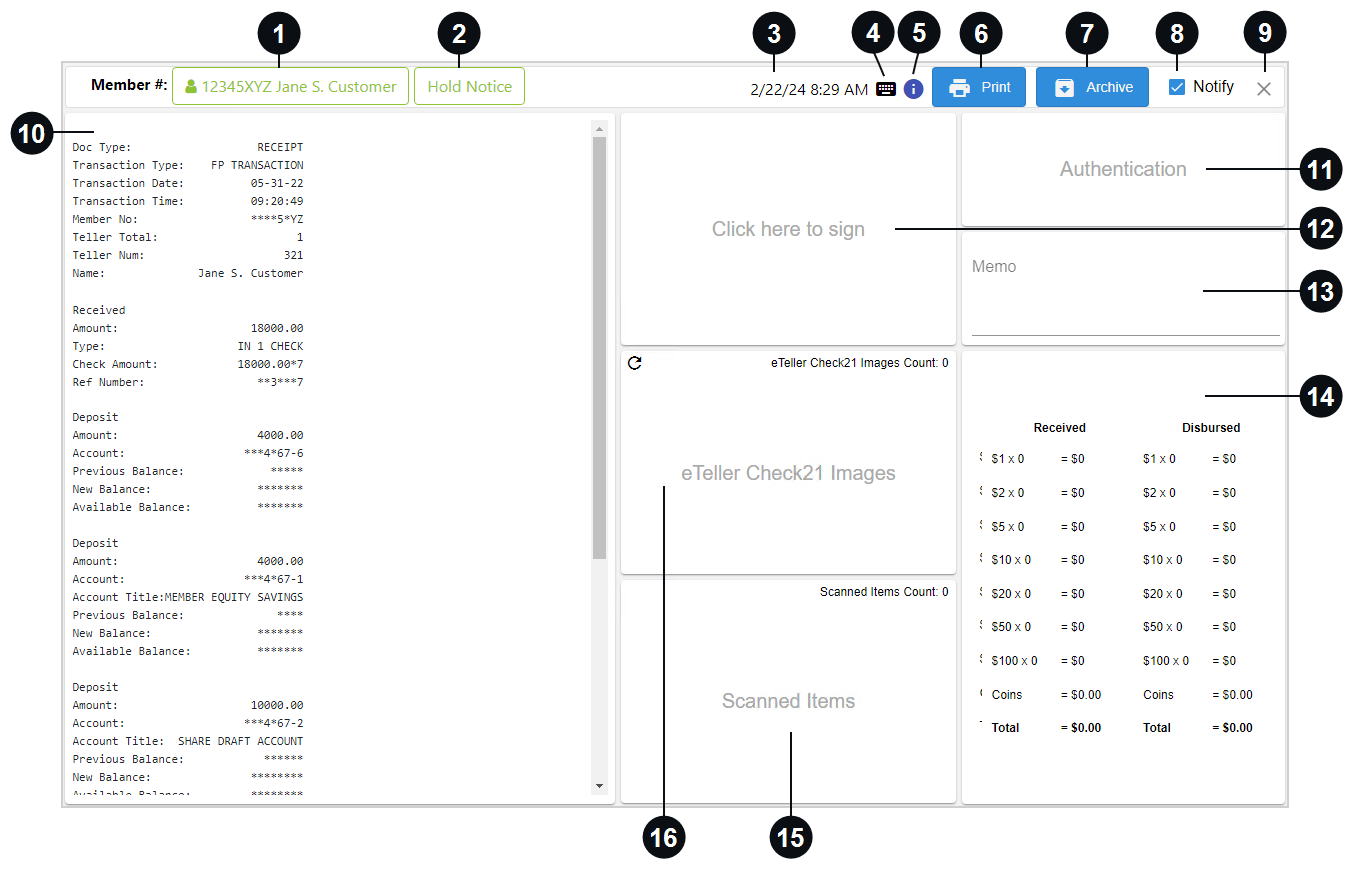
When a receipt is generated, the Teller Portal launches and the transaction page is displayed. The Teller Portal opens on top of any existing windows to alert the teller that a new transaction is available. Perform all actions related to the transaction here. Jump to the end of this section to view a fully populated transaction page.
Note: Depending on your environment, you may see the term "account" used instead of "member." The examples in this documentation use the term "member" except where noted.


|
Member # / Account # |
The member or account number and name are displayed here (if available) in the Member # / Account # button. Click the Member # / Account # button to display the Update Member Information / Update Account Information window. The Update Member Information / Update Account Information window is displayed automatically if the member or account number could not be extracted from the data file. Refer to Update Member or Account Information for details. Depending on the information extracted from the data file, your Member # / Account # button will look different.
|

|
Hold Notice | If the Hold Notice button is displayed, there is a hold on the account. When the Hold Notice button is disabled, you are being notified that the member or account number and name need your attention. You must fix any issues with the number and name first before you can click Hold Notice. Refer to Hold Notices for details. The Hold Notice feature may not be applicable to you depending on the settings configured by your administrator or your integration. |

|
Date and Time of Transaction | The date and time of the transaction are displayed here. |

|
Transaction Keyboard Shortcuts | Click the Transaction Keyboard Shortcuts icon to view all of the keyboard shortcuts associated with the page. When the Transaction Keyboard Shortcuts |

|
Transaction Info for Support Team | Click Transaction Info for Support Team |

|
Click Print to print a copy of the receipt that is displayed on the page. Refer to Print Receipts for details about printing receipts. Refer to Settings for details about selecting and configuring a printer. | |

|
Archive | Archive the transaction. Refer to Archiving a Transaction for details. |

|
Notify | If Notify is selected, the consumer will receive an e-receipt of the transaction via email and/or text message when the transaction is ready to be archived. Refer to Send Archived Receipts to Your Members for details. Text message notifications are a paid, optional feature and may not be applicable to your environment. |

|
Close | Click X to exit the transaction page and navigate to the Dashboard page. Depending on the settings configured by your administrator, this may not be displayed. |

|
Receipt | The receipt data is displayed here. The receipt data is passed to eReceipts from the core system or from Offline Transactions. This information is included in the final PDF receipt that is archived and printed on the paper receipt or e-receipt that the consumer receives unless the information is set to be masked or suppressed. Use the scroll bar if necessary to view the entire receipt. |

|
Authentication | Enter the method used to authenticate the person requesting the transaction and the accompanying document ID number. The authentication type and the document ID are noted and kept with the transaction for future review if needed. The document ID is only displayed in the archived transaction. Refer to Get Authentication for details. |

|
Click here to sign | Capture customer signatures digitally. To begin, click the Click here to sign card. The default signing method is automatically used. Hover over the Click here to sign card to change the signing method (Change Mode) or to clear an existing signature (Clear).
Refer to Get Signatures for details about creating signatures. Refer to Settings for details about changing the signature capture settings on your workstation. Stop: If a signature is needed, do not forget to capture the signature before clicking Archive. |

|
Memo | Enter notes about the transaction by clicking the Memo card on the transaction page. Memos are visible to your customers. Discretion should be used. Refer to Enter a Memo for details. |

|
Received / Disbursed | During a transaction, cash given (disbursed) to a customer and cash received from a customer is extracted from the receipt data and automatically populated in the Received / Disbursed card. If the receipt does not contain the cash received/disbursed details, then the cash received/disbursed can be manually recorded by clicking the Received / Disbursed card. The totals are calculated on-the-fly based on the data populated in the Received / Disbursed card. Refer to Enter Received and Disbursed Amounts for details. |

|
Scanned Items | Easily access, manage, and store scanned images virtually. Scanning can be used to capture in-person, handwritten signatures (wet signatures) on receipts. With an attached check scanner, you can capture any type of check-sized document that needs to be stored with the transaction. Scanning an ID for proof of authentication is also supported if the feature is enabled. This allows the financial institution to reduce the storage of hard copy documents. Refer to Scan Documents for details. |
|
|
eTeller Check21 Images |
If IMM eTeller Check21 is enabled, the eTeller Check21 Images card is displayed. View scanned Check21 images here. Depending on your integration method, the eTeller Check21 Images card will function differently. Refer to IMM eTeller Check21 for details. This card is not displayed if IMM eTeller Check21 is not enabled. |
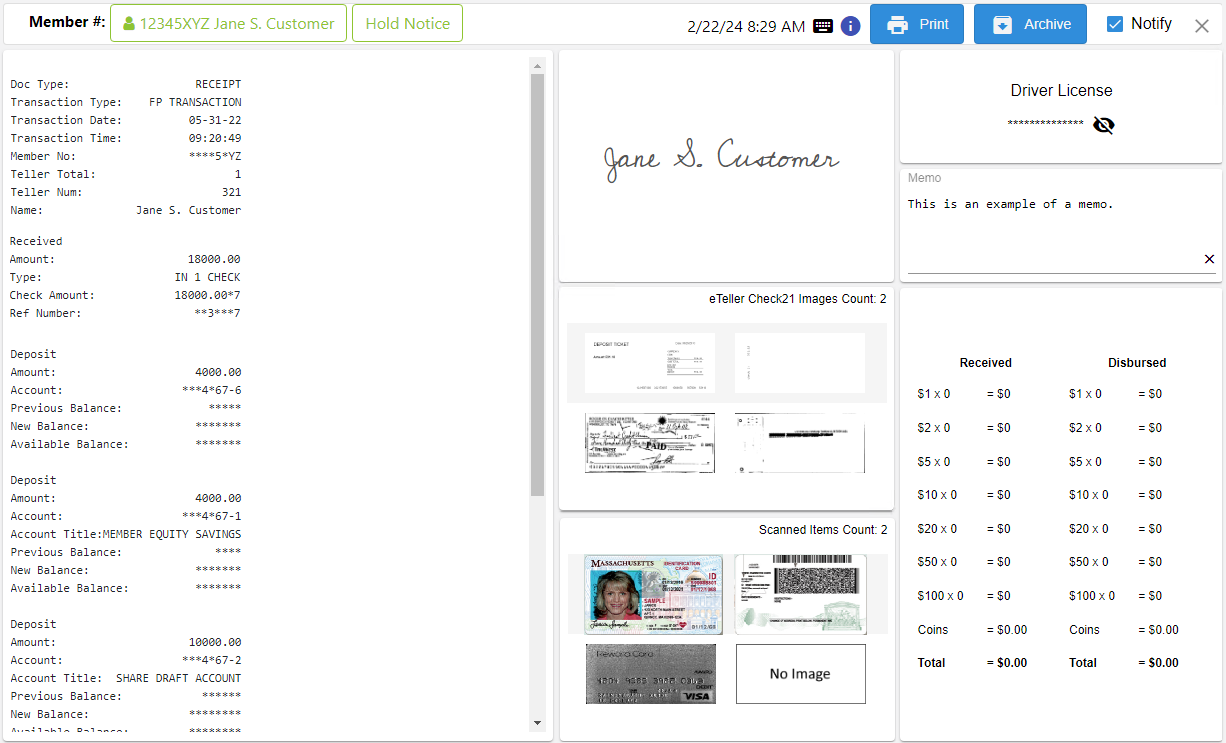
This is an example of the transaction page when information is populated.

Note: Refer to Offline Transactions for details about offline transactions. Refer to Report Transactions for details about report transactions.


